TheGeekery

The Usual Tech Ramblings

Enable-RemoteMailbox - The address is invalid

In the process of migrating our mailboxes from our on-premise Exchange servers to Office 365, we had to rewrite the mailbox enable scripts. This script keys off of our HR database, does some magic, then calls Enable-Mailbox on Exchange 2010 servers. To update this to support creating mailboxes in Office 365, we needed to set user licenses, and use the Enable-RemoteMailbox command in Exchange 20131.

One of the quirks we stumbled upon is a bug in the Exchange 2013 tools that didn’t allow it to identify the domain for the remote routing address. This is what we’d get:

[PS] C:\ > Enable-RemoteMailbox Jonathan.Angliss

The address '@mytenant.mail.onmicrosoft.com' is invalid: "@mytenant.mail.onmicrosoft.com" isn't a valid SMTP address. The domain name can't contain spaces and it has to have a prefix and a suffix, such as example.com.
    + CategoryInfo          : NotSpecified: (:) [Enable-RemoteMailbox], DataValidationException
    + FullyQualifiedErrorId : [Server=Exchsvr01,RequestId=190c9764-d8bd-446e-ac43-7c80bcc54eea,TimeStamp=6/3/2014 1:19:33 PM] [FailureCategory=Cmdlet-DataValidationException] 730D5E7F,Microsoft.Exchange.Management.RecipientTasks.EnableRemoteMailbox
    + PSComputerName        : Exchsvr01


According to the Microsoft documentation for Enable-RemoteMailbox you should be able to specify just the sAMAccountName as an argument, the rest should be calculated.

The remote routing address doesn’t need to be specified because mail flow between the on-premises organization and the service has been configured. Using this configuration, the Enable-RemoteMailbox cmdlet automatically calculates the SMTP address of the mailbox to be used with the RemoteRoutingAddress parameter. — Microsoft TechNet

This apparently isn’t the case, so some tweaking was needed. We called upon Get-ADUser to retreive the account, and fill in the rest.

[PS] C:\ > Get-ADUser jonathan.angliss | Enable-RemoteMailbox $_.sAMAccountName -RemoteRoutingAddress "$($_.sAMAccountName)@mytenant.mail.onmicrosoft.com"

As this is part of a script, the content is slightly different, but you can see how it works. We used Get-ADUser earlier in the script to pull other user data to calculate licensing requirements, but if you’re doing this as a one off and are seeing the error then you could just as easily do this:

[PS] C:\ > Enable-RemoteMailbox jonathan.angliss -RemoteRoutingAddress '[email protected]'

Hat tip goes to Steve Goodman for posting similar work, and getting me back on track.

  1. If you are using a 2010 Exchange environment, you need a 2013 server to act as a Hybrid server to migrate users. 

Exchange 2010, 2013, and Office365: Dynamic Distribution List Filters

In our transition to using Offce365 for email services, we’ve had some interesting discoveries. Some of them are revolving around Dynamic Distribution Lists (DDLs). These are groups which have members identified at time of delivery of emails, and are based on various styles of queries. We usually use PowerShell style queries to build the groups, but LDAP works, as does simple queries based on fixed parameters.

One of the interesting observations is that Exchange will tack extra query parameters into the DDL to exclude system mailboxes. For example the following query string:

(RecipientType -eq 'UserMailbox') -and (CustomAttribute4 -eq 'Plano')

Will actually result in the follow query:

((((RecipientType -eq 'UserMailbox') -and (CustomAttribute4 -eq 'Plano')) -and (-not(Name -like 'System{*')) 
-and (-not(Name -like 'CAS_{*')) -and )-not(-not(RecintTypeDetailsValue -eq 'MailboxPlan')) 
-and (-not(RecipientTypeDetailsValue -eq 'DiscoveryMailbox')) 
-and (-not(RecipientTypeDetailsValue -eq 'ArbitrationMailbox')))

This forces Exchange to exclude any of the system mailboxes for delivery, which is what you want it to do. The problem is, this additional data varies from version to version, and it’s not always backwards compatible. One of the observations is that in Exchange 2013 they introduced a RecipientTypeDetailsValue of PublicFolderMailbox. This is great, except that value is invalid in 2010. What does that mean?

Let’s try an example. From one of our on-prem 2013 hyrbid servers, we’re going to create a new distribution group with the initial query we gave as an example above…

New-DynamicDistributionGroup -Name 'JATestDist' -RecipientFilter "(RecipientType -eq 'UserMailbox') -and (CustomAttribute4 -eq 'Plano')"

Now it’s created, lets see what we have for a query parameter:

PS C:\> Get-DynamicDistributionGroup -Identity 'JATestDist' | Select RecipientFilter | fl


RecipientFilter : ((((RecipientType -eq 'UserMailbox') -and (CustomAttribute4 -eq 'Plano'))) -and (-not(Name -like
                  'SystemMailbox{*')) -and (-not(Name -like 'CAS_{*')) -and (-not(RecipientTypeDetailsValue -eq
                  'MailboxPlan')) -and (-not(RecipientTypeDetailsValue -eq 'DiscoveryMailbox')) -and
                  (-not(RecipientTypeDetailsValue -eq 'PublicFolderMailbox')) -and (-not(RecipientTypeDetailsValue -eq
                  'ArbitrationMailbox')))

As we can see, a whole bunch of extra options, including our PublicFolderMailbox option. Lets test to see what users we get back…

[PS] C:\>$dist1 = Get-DynamicDistributionGroup -Identity 'JATestDist'
[PS] C:\>Get-Recipient -RecipientPreviewFilter $dist1.RecipientFilter
$dist1 = Get-DynamicDistributionGroup -Identity 'JATestDist'
Get-Recipient -RecipientPreviewFilter $dist1.RecipientFilter

Name                                                        RecipientType
----                                                        -------------
Angliss, Jon                                                UserMailbox

Okay, so we get results back, no big deal right? Now I’m going to go to a 2010 server, and without changing anything, I’m going to see what results we get back…

[PS] C:\>$dist1 = Get-DynamicDistributionGroup -Identity 'JATestDist'
[PS] C:\>Get-Recipient -RecipientPreviewFilter $dist1.RecipientFilter
The recipient preview filter string "((((RecipientType -eq 'UserMailbox') -and (CustomAttribute4 -eq 'Plano'))) -and (-not(Name -like 'SystemMailbox{*')) -and (-not(Name -like 'CAS_{*')) -and (-not(RecipientTypeDetailsValue -eq 'MailboxPlan')) -and (-not(RecipientTypeDetailsValue -eq 'DiscoveryMailbox')) -and (-not(RecipientTypeDetailsValue -eq 'PublicFolderMailbox')) -and (-not(RecipientTypeDetailsValue -eq 'ArbitrationMailbox')))" is neither a valid OPath filter nor a valid LDAP filter. Use the -RecipientPreviewFilter parameter with either a valid OPath filter string or a valid LDAP filter string.
    + CategoryInfo          : InvalidArgument: (:) [Get-Recipient], ArgumentException
    + FullyQualifiedErrorId : 79B22B5B,Microsoft.Exchange.Management.RecipientTasks.GetRecipient

Now we see an error. This is because 2010 doesn’t like PublicFolderMailbox as a RecipientTypeDetailsValue, and as such, throws it out as an error. So we have to go back to the 2010 server and edit the query, and reset it to be what we wanted originally:

[PS] C:\>Set-DynamicDistributionGroup -Identity 'JATestDist' -RecipientFilter "(RecipientType -eq 'UserMailbox') -and (CustomAttribute4 -eq 'Plano')"
[PS] C:\>$dist1 = Get-DynamicDistributionGroup -Identity 'JATestDist'
[PS] C:\>Get-Recipient -RecipientPreviewFilter $dist1.RecipientFilter
$dist1 = Get-DynamicDistributionGroup -Identity 'JATestDist'
Get-Recipient -RecipientPreviewFilter $dist1.RecipientFilter

Name                                                        RecipientType
----                                                        -------------
Angliss, Jon                                                UserMailbox

This same query is happy on the 2013 servers as well, however, it will attempt delivery to a Public Mailbox if your other query parameters allow for it. In the example above, we set the RecipientType to be a very specific value, so this shouldn’t allow for this to happen anyway.

One other observation, when migrating your queries to be Office 365 Hybrid complaint, you will also need to include the RecipientType of MailUser. For example:

((RecipientType -eq 'UserMailbox') -or (RecipientType -eq 'MailUser')) -and (CustomAttribute4 -eq 'Plano')

Mailboxes that are migrated change their RecipientType to be MailUser.

There are lots of other fun things about DDLs that you’ll have to be aware of, which I shall cover in a separate post, but this is one of the fun gotchas I discovered in a mixed environment that’ll impact people using Exchange 2010 and 2013 in the same environment.

Exchange and The Case of The Missing Counters

While setting up SolarWinds SAM AppInsight for Exchange, I stumbled across a small Exchange setup bug where it’s not correctly deploying all the counters for the server roles that are being used. When SAM does the checks for the performance counter, you’ll see an error like the following:

'Average Document Indexing Time'
'Performance counter not found'

The solution is fairly simple, you have to copy the counters from the install media, and register them using PowerShell. The one caveat is that the counters aren’t on all the install media, so if you have CU3 setup files for example, they are not there. You have to go back to the original install DVD and get them from there. Here are the steps:

  1. Find the missing performance counter files on the install media, usually in <install media>\setup\perf
  2. For the above counter, the files needed are:
    1. IndexAgentPerfCounters.h
    2. IndexAgentPerfCounters.ini
    3. IndexAgentPerfCounters.xml
  3. Copy the files to <install path>\Setup\perf
  4. Open a PowerShell prompt with elevated privileges
  5. Execute the following commands:
Add-PSSnapin Microsoft.Exchange.Management.PowerShell.Setup
New-PerfCounters -DefinitionFileName "<install path>\Setup\Perf\IndexAgentPerfCounters.xml"

Obviously adjust <install path> to be the correct path.

This is documented on the SAM product blog (here) and in the SolarWinds Knowledge Base (here), with the missing step of Add-PSSnapin.

L vs R and the importance of documentation

This post was going to be one of those rant posts about not following instructions, and then I realized this is a common problem that a lot of people have issues with, not just in the IT world. It is the importance of knowing what L and R is referring to. By L and R, I mean left and right.

This might seem silly and trivial, because we all know our left hand and our right hand, and in general when somebody says it’s in the left hand side of the cabinet, you know exactly where to look. But what happens if you are working on something that can be reached/used from both sides? Is that the left hand side relative to the front, or the back?

This comes up with other things too. How many times have you gone to a car mechanic and said “my left brake squeals when I apply the brakes”? Is that the left side when looking at the car, or driving the car? This is why you’ll find a lot of mechanics refer to the sides as driver and passenger, there is no confusion there.

The whole point of this post is about the importance of documenting exactly what is referred to as L and R, because it makes a great deal of difference when you are putting rails on a server. Why you might ask? It’s all about server removal…

A lot of rail kits consist of 3 major parts, the server portion, the cabinet/rack portion, and the slider. The server portion is usually screwed/clipped onto the server, and is stationary. The cabinet/rack portion is also stationary, and attached to the cabinet/rack. Then there is the slider portion. This portion is “attached” to the server and cabinet portions, has ball bearings, and allows the server to slide in and out of the rack. It slides on tracks in the cabinet portion, and the server portion slides on bearings to slide out. This allows for people to work on the server without having to completely remove the server.

Also part of the slider is usually a catch. This catch is to stop you from pulling the server completely off the rails and having it come crashing down to the floor. Something most people don’t want to happen. And it is with this part of the rails that it is important to know what is L and what is R. This catch usually has an orientation so that it can “clip” into the slider rail, and pushing the catch down allows the server rail to slide out of the slider rail. If you mount the server rail on the wrong side, the catch either doesn’t work properly, or becomes impossible to remove.

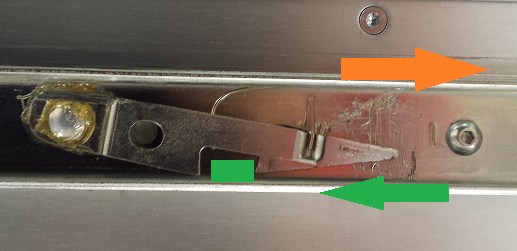
Here is an example of one of those catches…

Rail Catch mechanism

If looking at this, you cannot figure out how this works, here is another picture with arrows. Arrows make everything easier to understand…

Rail Catch mechanism directions

When you pull the server out, it moves in the direction of the top arrow (orange). Near the end of the slider rail is a small block, this block (shows as a green blob) moves along the server rail in the direction of the bottom arrow (green). As it gets to the catch, it pushes it up, and the spring in the catch pushes it back down when the block moves into the void. Because of the shape of the void, the green blob is prohibited from moving any further, and stops the server sliding off the end of the rail.

If you need to actually remove the server from the rails completely, you simply pull the catch up, which moves the blob outside the void of the catch, and pull the server forward. If you put the rail on upside down, instead of the block catching on the void in the catch, it actually stops when it hits the mount point of the catch. This is why it’s important to know which way around to mount the rails (note the little L next to the screw).

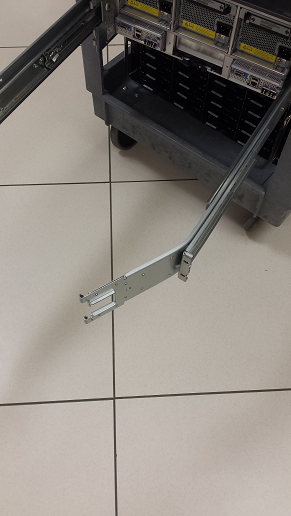
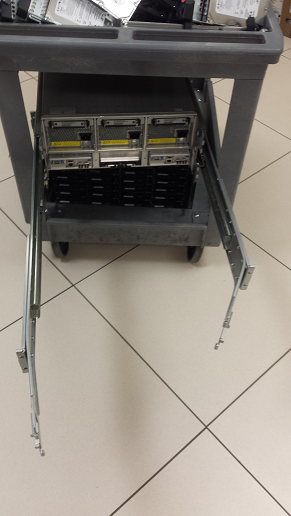
This situation caused myself and a co-worker some struggles as we could not get the server unmounted from the rails. Ultimately we ended up having to unscrew the rails from the rack, with the server still attached, fully extend the rails, and then bend them in so that we could pull the server out of the rack. Fortunately this was a sever that is well past EoL, so this wasn’t a hard decision to make, or live with.

Server rail bend 1

Server rail bend 2

That all being said, it is important to make documentation as clear and concise as possible. Images are very useful in this situation. A server we put in place of this one had really clear documentation, and the rails themselves even had pictures of the configuration, essentially saying “This rail goes on the left here” with a picture of where the rail was located in relation to the server.

So next time you’re writing documentation for something, and there is an opportunity for ambiguity, clear up the documentation and remove any doubt.

Unable to remove Exchange Mailbox Database

We had an odd issue recently where our Exchange server refused to let us remove a mailbox database, citing that the database had one or more mailboxes. The exact error was this:

This mailbox database contains one or more mailboxes, mailbox plans, archive mailboxes, public folder mailboxes or arbitration mailboxes. To get a list of all mailboxes in this database, run the command Get-Mailbox -Database . To get a list of all mailbox plans in this database, run the command Get-MailboxPlan. To get a list of archive mailboxes in this database, run the command Get-Mailbox -Database -Archive. To get a list of all public folder mailboxes in this database, run the command Get-Mailbox -Database -PublicFolder. To get a list of all arbitration mailboxes in this database, run the command Get-Mailbox -Database -Arbitration. To disable a non-arbitration mailbox so that you can delete the mailbox database, run the command Disable-Mailbox . To disable an archive mailbox so you can delete the mailbox database, run the command Disable-Mailbox -Archive. To disable a public folder mailbox so that you can delete the mailbox database, run the command Disable-Mailbox -PublicFolder. Arbitration mailboxes should be moved to another server; to do this, run the command New-MoveRequest . If this is the last server in the organization, run the command Disable-Mailbox -Arbitration -DisableLastArbitrationMailboxAllowed to disable the arbitration mailbox. Mailbox plans should be moved to another server; to do this, run the command Set-MailboxPlan -Database .

Okay, so thinking we were being stupid and missed the arbitration mailboxes, we ran the recommended commands, with no such luck:

[PS] D:\>get-mailbox -database 'Mailbox Database 2102391437' -Arbitration
[PS] D:\>

The same was true of mailbox plans, and archive mailboxes. After some head scratching, I stumbled across this post on TechNet. The basic gist is that because Exchange is in a multi-domain forest, the get-mailbox command will usually only search in the domain you are active in. To make Exchange operate outside of the working domain, you have to set the server settings.

[PS] D:\>set-adserversettings -ViewEntireForest $true
[PS] D:\>get-mailbox -database 'Mailbox Database 2102391437'
[PS] D:\>get-mailbox -database 'Mailbox Database 2102391437' -Arbitration

Name                      Alias                ServerName       ProhibitSendQuota
----                      -----                ----------       -----------------
SystemMailbox{bb558c35... SystemMailbox{bb5... msg014a          Unlimited
Migration.8f3e7716-201... Migration.8f3e771... msg014a          300 MB (314,572,800 bytes)

Sure enough, those system mailboxes hiding out in the mailbox database. Now we can see them, we can move the mailboxes off of the database, and then remove the database.

SolarWinds Application Monitor - Automatically Configuring AppInsight for Exchange

I’m going to make some assumptions in this post as it’s about a specific product. First, let us assume you are a long time user of SolarWinds Server & Application Monitor (previously known as Application Performance Monitor). Let’s also assume you have a Microsoft Exchange 2010 (or 2013) environment. I’m also going to assume that you have WMI monitoring working for your servers. And for the final assumption, let’s say that you just found out that the latest SAM update (6.1) now includes Exchange monitoring ‘out of the box’. After you’ve finished doing a happy dance, and that you no longer have to tinker with all the extra application monitors now, you set about figuring out how to enable this new functionality.

First, there are some caveats. The first is that this new functionality is only targeted for the Exchange Mailbox role. This means that if you have separated roles, such as CAS or Transport, don’t bother trying to point it at those servers, it just won’t find anything1.

The second caveat is permissions. To let the auto-configuration work (which is what this post will be about), you’ll need to have the account SAM uses have temporary administrative access to the mailbox server.

Now you’ve added your WMI service account to the “Administrators” group on your Mailbox servers. The next step is to make sure your service account has the right access within Exchange. There are 2 roles the account needs, Mailbox Search and View-Only Organization Management. The latter can be handled by adding the service account to the role that is already defined. The former needs to be created specifically for this purpose.

Now let’s see what we have to do in SAM. There are 2 ways to do this, I’m going with the way I’m familiar with, and it’s the same as if you add new drives/volumes, or extra hardware to a server. Locate your server in the SAM interface, scroll down to the “Management” box, and click on “List Resources”. The other method is to use the Sonar Discovery tool.

SAM Node Management

Let SAM do its work, and wait patiently. This can take a minute or two depending on the load on both servers. Once it has finished its autodiscovery process, you should now see new applications under the AppInsight Applications umbrella, check the box and click “Save”

SAM Node Resources

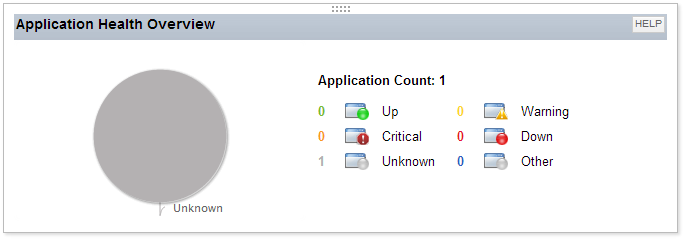
Once you’ve done this, your “Application Health Overview” section should now show an application in an “Unknown” status.

SAM App Health

Click on the “Unknown” line and you’ll be taken to a view listing the unknown applications. This should (hopefully if you’ve set stuff up right) be just the Microsoft Exchange app. Click on that.

SAM Unknown Apps

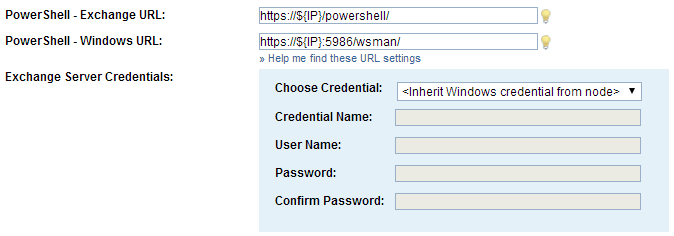
At the top of the page, in the “Management” section, click on the “Edit Application”. There are 3 important items on the page that follows. The first is the URLs, if you use the defaults for most of your environment for configuration, these should probably be left alone. The Windows URL for PowerShell is for the remoting functionality, which will be configured automatically if you have not already done so. The next is the server credentials used to access Exchange and the server. Usually the “Inherit Windows credential from node” is good enough, assuming the monitoring service account is the same you want to use for monitoring.

SAM Exchange URLs

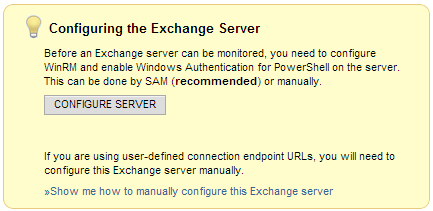
Now we’ve got this far, the last thing to do is hit the “Configure Server” button. This process configures WinRM, and the Exchange PowerShell web services for SAM to access.

SAM Configure Exchange Server

Usually this step can take a minute or two, and is a perfect time to go grab yourself a drink. When you return, and everything says it was successful, hit the “Test Connection” button just to make sure.

If you’re curious about what goes on behind the scenes of the “Configure Server” button, I’ll also be writing up the manual process, which is exactly what this does.

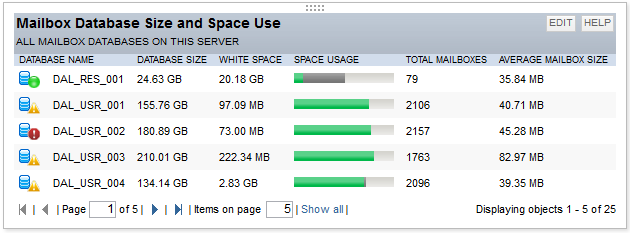
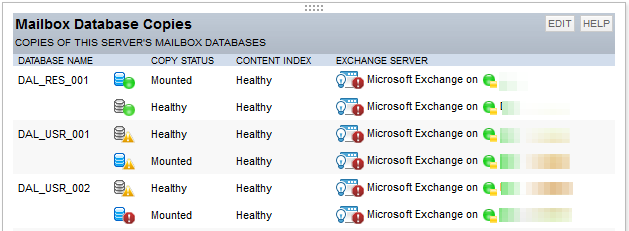
You are now ready to enjoy statistics and monitoring for your Exchange Mailbox server, including items such as largest mailbox, quota usage, messages sent, DAG and cluster statuses, and the likes.

Exchange - Users by Messages Sent Exchange - Users by Mailbox Size Exchange - Database Size and Space Use Exchange - Database Copies

So far I’m very happy about getting this deployed. It’s actually giving me some numbers behind some of the concerns I’ve had since I started where I work. For example, we have quotas that restrict sending, but not delivery, so mailboxes can exceed the quota size by a lot, as long as they are receiving only.

Edit (04/22/2014): It appears that when answering a question on Thwack, part of the problem I had locating the automatic configuration is that there may have been a step missing. The documentation mentions to go to the “All Applications” resource, which is not on the node page, but on the Applications / SAM Summary page. The thread with that conversation on is here. As of 13:57 US Central time, they have added that the documentation will be updated to clear up the confusion.

  1. This gives me a sad face, and I’m hoping that it’ll be added as new features in upcoming releases. 

Azure VMs and Setting Subnets via PowerShell

One of the projects I’ve been working on recently is a POC in Azure to allow us to move a collection of desktop users to lower end laptops, while using high end servers to perform a lot of data processing. The idea is that we can spin up and destroy machines as we see fit. The plan was fairly solid, and we build out our domain controllers and a template machine with all the software in it, before configuration. We then used PowerShell to spin up new machines as we needed them.

One of the issues I stumped over when working on this was making sure the servers were put into the right network. This was important as they were being joined to a domain. I had originally started with something like this:

$img = 'imgid_Windows-Server-2008-127GB.vhd'
$svcname = 'mytestservice01'
$svcpass = '!testpass321!'
$svcuser = 'testadmin'

$vm1 = New-AzureVMConfig -ImageName $img -InstanceSize 'ExtraSmall' -Name $svcname | `
	Add-AzureProvisioningConfig -WindowsDomain -AdminUsername $svcuser -Password $svcpass -DomainUserName 'dmnadmin' -Domain 'TestDomain' -DomainPassword 'ImnotTelling!' -JoinDomain 'TestDomain.local' -TimeZone 'Canada Central Standard Time'

New-AzureVM -VMs $vm1 -ServiceName $svcname -VNetName 'Test_Net' -AffinityGroup 'TestGroup-USEast'

This seemed to look right, and worked fine, as long as I wasn’t trying to add it to a VNet or an Affinity Group. When I added those options, I was thrown the following error:

New-AzureVM : Networking.DeploymentVNetAddressAllocationFailure : Unable to allocate the required address spaces for the deployment in a new or predefined subnet that is contained within the specified virtual network.

It seemed to me that the New-AzureVM command should have had some method to define which subnet was to be allocated to, but it wasn’t there. What was even more confusing was this VNet only had a single subnet, so you’d think it might select that, but not so much luck.

The answer lies in the Set-AzureSubnet command, which should have been pretty obvious to me. You can add it as part of your provisioning command like this:

$vm1 = New-AzureVMConfig -ImageName $img -InstanceSize 'ExtraSmall' -Name $svcname | `
    Add-AzureProvisioningConfig -WindowsDomain -AdminUsername $svcuser -Password $svcpass -DomainUserName 'dmnadmin' -Domain 'TestDomain' -DomainPassword 'ImnotTelling!' -JoinDomain 'TestDomain.local' -TimeZone 'Canada Central Standard Time' | `
	Set-AzureSubnet 'Subnet-1'

All I’ve done is added the extra command to the end, and now Azure is happy. This will spin up a new VM and drop it in the right VNet, Affinity Group, and Subnet. Based on the VNet’s network configurations, and DNS settings, the new machine is provisioned, and joined to the domain immediately.

This makes me very happy because this is a quick sample of how we’d proceed with automating and deploying an undefined number of VMs in Azure based off of our golden image. With some minor tweaks we can loop through and spin up 50 machines with little work.

Joys of a new work environment

So it has been a substantially long time since I’ve posted something, and that’s not because I’m being lazy. Well, okay partially because I’m lazy. Evernote has about 7 notes in it for things I want to post about, mostly issues I’ve resolved, but I’ve just been super busy recently.

One of the things I’ve thoroughly enjoyed about my change in work places has been the learning experiences I’ve been subjected to. Where I used to work was pretty much the same stuff, day in, day out. There was little change, and even the introduction of new companies being acquired really didn’t change that. They were either sucked into the fold and their technologies changed to ours, or they were kept separate and I had little to do with them.

Since changing companies I’ve gone from just using VMware and a small level of administering the infrastructure, to being one of the “go-to” people for it in our environment. Same with the storage infrastructure. Where I used to work there was 2 classes of storage, the big beafy HQ stuff where I had no control over at all, to the local NAS which I managed. This has changed to being one of the “go-to” people for the storage stuffs too.

None of that is to say I didn’t learn stuff where I used to work. Due to all the issues we had with code and servers, I have a very broad range of troubleshooting skills that have come in very handy. It helps that I also got a good look at a lot of the code there too because I’ve got a knowledge of reading and understanding code that I probably wouldn’t have in otherwise.

The cool thing about the place I work now is that the development team drive a lot of the changes, working with a very agile development structure. They push the boundaries of our infrastructure, and we adapt and solve for their problems or ideas. This has lead to some pretty cool stuff, and melding of technologies. For example, I’m currently reading up on IIS ARR1. Last month I was tinkering with Windows Azure.

On my list of new things I’ve been learning and playing with at work:

  • IBM DataPower Appliances
  • VMware ESXi
  • HP 3Par SAN storage
  • Brocade fiber switches
  • HP servers (used to work in an all Dell office)
  • HP Blade chassis
  • Microsoft Azure
  • Exchange 2010 (Been away from Exchange for a long time)
  • More PowerShell than just my “tinkering” scripts
  • More indepth IIS work
  • ISA/TMG
  • Lync 2010/2013 (I built out the infrastructure and deployed both)
  • McAfee Mail gateways
  • HP Rapid Deployment tools
  • Lots more stuff I am always forgetting…

One thing that did surprise me was becoming a mentor of sorts too. People come to me for guidance and tips on issues. I don’t give out answers, but I’ll guide them in the right direction. This has interested me because I’ve never considered myself an educator in any way, but I apparently seem to be doing okay at guiding people.

I love my job, constantly learning, even when not working with new stuff. As my boss and I constantly say “never a boring day”.

  1. IIS Application Request Routing. It’s being used as a potential replacement for ISA/TMG, but is much more, including load balancing, content caching (think CDN), reverse proxy, ssl offloading, and so on. 

Lync and Phone Number Normalization

One of the handy things about Lync is the fact that it’ll parse the Global Address List (GAL), and make them available via the Lync client (using the abserver). This means that Lync will do all the lookup using its own copy of the GAL, rather than hitting the GAL. Additionally, that processed addressbook is cached on the client side, allowing much speedier lookups.

One of the things we’d noticed is that Lync likes the phone numbers formatted in a particular manor, otherwise you end up with some very strange number/calling issues. This leads to a problem because folks update their own address and phone information resulting in a myriad of number formats in Active Directory. A couple of examples:

  • 555 555 1234
  • 555.555.1234
  • (555) 555-1234
  • (555) 555.1234
  • 555.555.1234 x555
  • 555.555.1234 ext. 555

Lync isn’t very happy with this, and will fail to parse these numbers. That is, unless you create normalization rules. This isn’t the same as “Voice Routing” normalization rules, which are rules that are applied when people make calls.

So how do you know Lync doesn’t like the phone numbers you have in the GAL? Lync logs the failures in the file stores path in a file (creatively) called ‘Invalid_AD_Phone_Numbers.txt’ under the file store location. Open the topology builder, and look at the “Files Stores” section, and go to that path in Windows Explorer. Under that path you’ll find a directory structure that looks like this:

  1-WebServices-1\ABFiles\00000000-0000-0000-0000-000000000000\00000000-0000-0000-0000-000000000000

The directory 1-WebServices-1 may have a different number depending on the number of Lync installations you have that are sharing the same file store, or if you’ve performed a transition between 2010 and 2013.

Using one of the above numbers as an example, you may find errors that look like this:

Unmatched number: User: '6493bb75-84e7-4f83-8bca-26f1f551a3d4'  AD Attribute: 'telephoneNumber'  Number: '555.555.1234 x555'

To fix this error, we need to create a normalization rule, these rules are stored in a text file called Company_Phone_Number_Normalization_Rules.txt which is stored in the 1-WebServices-1\ABFiles directory. This file uses regular expressions to match and reformat the numbers to an E.164 format. In the above example, I want to convert the number to be +15555551234;ext=555, so I’d using the following regular expression:

^(\d{3})\D*(\d{3})\D*(\d{4})[xX](\d+)$
+1$1$2$3;ext=$4

Once added to the file, and saved, we can test using the abserver tool with the right arguments. From the <install path>\Microsoft Lync Server 2013\Server\Core we can run the following:

abserver.exe -testPhoneNorm "555.555.1234 x555"
args[1]: 555.555.1234 x555
555.555.1234 x555 -> tel:+15555551234;ext=555
    Matching Rule in Company_Phone_Number_Normalization_Rules.txt on line 22
        ^^(\d{3})\D*(\d{3})\D*(\d{4})[xX](\d+)$$

It’ll tell you the line number it matched the rule, and what the outcome of the rewrite looks like, a nicely formatted E.164 phone number.

The next step is to make sure you have normalization rules enabled, this is done using Get-CsAddressBookConfiguration

PS C:\> Get-CsAddressBookConfiguration


Identity                   : Global
RunTimeOfDay               : 1:30 AM
KeepDuration               : 30
SynchronizePollingInterval : 00:05:00
MaxDeltaFileSizePercentage : 20
UseNormalizationRules      : True
IgnoreGenericRules         : False
EnableFileGeneration       : True

Note the UseNormalizationRules is set to True, if it isn’t use Set-CsAddressBookConfiguration to change it. Once set, you can leave it to the automated process to pick up the changes at the next cycle (in my case 01:30 the following day) or you can use Update-CsAddressBook to force an update.

This process usually takes a little fiddling to adjust for all the variations in phone numbers, but once setup it makes life a lot better for the users.

Cross domain execution of Lync commands

For the last few weeks I’ve been performing all the preparation work for Lync 2013 in our organization. We’ve had a very successful Lync 2010 pilot, and instead of expanding the 2010 to production, and later having to do a full environment replace for 2013, we decided to jump straight to 2013. Part of the steps, whether a fresh install or an upgrade, is some Active Directory Forest and Domain preperations. These can either be done using the installation wizard, or via PowerShell.

One of these commands is Grant-CsOUPermission. This command is required if you don’t keep your users/servers/computers in the standard containers in AD (I.e, Users in the Users container). In our environment, we move the users into a People OU, so we needed to run the Grant-CsOUPermission command to update some container permissions for Lync to work properly, and allow us to delegate user management. To save some time, I was executing all the commands from one domain, to one of the other child domains in the forest. This was because I didn’t have access to a 64bit machine in that environment without spending additional time spinning up a client to test with. The Lync PowerShell cmdlets allow for this, and this is what I was doing, and having issues with.

I’d first start a PowerShell prompt as a domain admin in the other domain using the runas command:

runas /profile /user:OTHERCHILD\myadmin powershell

Next is to import the Lync modules:

Import-Module Lync

Then the final step is to enable the domain, and grant the necessary permissions to the OUs I needed to modify.

Enable-CsAdDomain -Domain otherchild.domain.tld
Grant-CsOUPermission -ObjectType "User" -OU "CN=People,DC=OtherChild,DC=Domain,DC=tld

This is where I was hitting a road block, the first command would execute just fine, but the second command would result in a permissions error.

The user is not a member of “Domain Admins or Enterprise Admins” group.

This was a weird error because I know I am a domain admin in the other domain, it wouldn’t have let me execute the Enable-CsAdAdmin if I wasn’t, and that went fine.

After some bashing of my head, and a good nights sleep, I realized the issue when I started looking at it this morning. I’d failed to specify the domain for the Grant-CsOUPermission command.

Grant-CsOUPermission -Domain otherchild.domain.tld -ObjectType "User" -OU "CN=People,DC=otherchild,DC=domain,DC=tld"

Adding the domain allowed execution. The problem here was that it was trying to bind to mychild.domain.tld and then access the OU through the link to otherchild.domain.tld. The problem here was that my account in otherchild.domain.tld didn’t have domain admin access in mychild.domain.tld, and hence the error.

So, learning lesson of the day, either execute all the commands on a server in the domain you are worknig on, or remember to specify the domain. As a side note, the Microsoft documentation is a little fuzzy around this area because it says you must sign in to a domain member on the domain you wish to execute the commands, but then specifies that you can execute the commands in a different domain. It gets a little confusing, but once you get your head wrapped around the fact that you can do this across domains, and that you must specify the domain, even if the OU hints at a different domain, things are a little easier to work with.